วันศุกร์ที่ 25 ธันวาคม พ.ศ. 2563

sqlite3 rpi4 Qt

ต้องลง sqlite3 ก่อน

sudo apt-get update
sudo apt-get install sqlite3

จากนั้นลง sqlitebrowser ตาม
sudo apt-get install sqlitebrowser

สร้าง database ดังนี้

$ sqlite3 test.db
sqlite> CREATE TABLE people(ids integer primary key, name text);
sqlite> .quit


ต่อมา จะเขียนโปรแกรมใน Qt ให้สามารถติดต่อกับ Database ได้ 

เมื่อเปิดโปรแกรม Qt ขึ้นมา ให้เปิด ไฟล์.pro และพิมพ์เพิ่มเข้าไปแบบนี้

 QT += sql

คลิกขวาที่โปรเจค แล้วกด Run Qmake


 คลิกขวาที่โปรเจค เพื่อเพิ่ม class


ตั้งชื่อ class ว่า dbmanager

เมื่อสร้าง class เสร็จแล้ว เราจะได้ dbmanager.h และ dbmanager.cpp มา

ในไฟล์ dbmanager.h ให้เขียน code ดังนี้

ส่วนไฟล์ dbmanager.cpp ให้เขียนดังนี้

ในไฟล์ main.cpp ให้เพิ่ม code ดังนี้
จากนั้นกด Run ก็จะเห็นว่ามีการสร้าง database ขึ้นมาแล้ว ในโฟลเดอร์ที่ระบุไว้

ถ้าหากเราต้องการฟังก์ชั่นอื่นๆที่สามารถจัดการกับ database ได้ ให้ทำดังนี้

1.เพิ่มใน dbmanager.h ในที่นี้ผมจะเพิ่มฟังก์ชั่นที่ชื่อว่า AddRecord โดยรับค่า QString เข้าไป

2.เพิ่มใน dbmanager.cpp

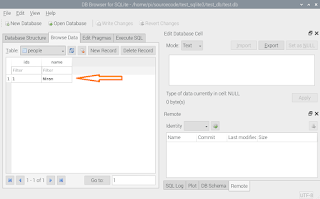
แล้วกด Run จะเห็นได้ว่า database ได้ถูกเพิ่มชื่อ Niran เข้าไปแล้ว โดยสามารถเปิดดูได้ใน sqlitebrowser ก็ได้

แก้ไข code ให้เช็คก่อนว่ามีชื่ออยู่แล้วหรือไม่

เมื่อกด Run จะเห็นได้ว่า มีการแจ้งว่า "Person exist"

และเมื่อเปลี่ยนชื่อใหม่เข้าไป ก็จะมีเพิ่มเข้าไปใน database.

จอบอ. 


ที่มา

https://scienceprog.com/powerful-open-source-sqlite-manager-for-raspberry-pi/ 

http://katecpp.github.io/sqlite-with-qt/


วันอังคารที่ 22 ธันวาคม พ.ศ. 2563

qt json

 วันนี้มีโอกาสใช้ json เป็นฐานข้อมูล

ก็เหมือนเดิม อาจารย์ google ช่วยได้

ต้องออกแบบหน้าตาของ json  ก่อน ว่าจะเก็บข้อมูลยังไง โดยผมกำหนดแบบนี้

ไฟล์ชื่อ  test_trans.json

{
    "HoseDelivery": [
        {
            "hose_num": 1,
            "id": 1
        },
        {
            "hose_num": 1,
            "id": 5
        }
    ]
}


เริ่มเขียน code

#include <QCoreApplication>
#include <QJsonObject>
#include <QJsonDocument>
#include <QJsonArray>
#include <QFile>
#include <QDebug>

int main(int argc, char *argv[])
{
    QCoreApplication a(argc, argv);

    QString val;
    QFile file;

//========================== read json file =====================
    file.setFileName("/home/pi/sourcecode/test_json/test_trans.json");
    file.open(QIODevice::ReadOnly | QIODevice::Text);
    val = file.readAll();
    file.close();
    QJsonDocument d = QJsonDocument::fromJson(val.toUtf8());
    QJsonObject sett2 = d.object();
    qDebug() << sett2;

    QJsonArray value = sett2["hose_delivery"].toArray();  // get data in hose_delivery 

    qDebug() << value;

    QJsonObject item = value[1].toObject();                        // make QJsonValue to Object
    qDebug() << item;

    QJsonValue text1 = item.value(QString("money"));
    qDebug() << text1;
    qDebug() << QString::number(text1.toDouble());

//============================ write json file ============================
    file.setFileName("/home/pi/sourcecode/test_json/test_trans2.json");
    file.open(QIODevice::ReadWrite | QIODevice::Text);
    val = file.readAll();

    QJsonDocument doc = QJsonDocument::fromJson(val.toUtf8());
    QJsonObject abc = doc.object();
    qDebug() << abc;

    QJsonArray valuez = abc["HoseDelivery"].toArray();  // get data in hose_delivery 

    qDebug() << valuez;


    QJsonObject hose_delivery;
    hose_delivery.insert("id",5);
    hose_delivery.insert("hose_num",1);
    valuez.append(hose_delivery);
    qDebug() << valuez;
    abc.insert("HoseDelivery",valuez);

    file.resize(0);
    file.write(QJsonDocument(abc).toJson(QJsonDocument::Indented));
    file.close();   // Close file

    return a.exec();
}


ที่มา

https://www.programmersought.com/article/2411597093/

วันอาทิตย์ที่ 20 ธันวาคม พ.ศ. 2563

Arduino VSCode

 วันนี้ลองใช้ Visual Studio Code (VSCode) ในการใช้งานกับ Arduino

ใช้งานครั้งแรกจะงงหน่อย จะสร้างโปรเจคยังไง เปิดไฟล์ยังไง เปิดไม่ถูก ต้องดูใน you tube ก่อน

เริ่มกันเลยดีกว่า

เมื่อเปิด vscode ขึ้นมาแล้ว ต้องลง extension arduino ก่อน

พอลงเสร็จ ก็จะสามารถใช้งาน arduino ได้

เริ่มต้นด้วยการคลิกไปที่ file, open folder, เลือก folder ที่เราต้องการเก็บ project ของเรา เราสามารถสร้างใหม่ได้

เมื่อเลือก folder เสร็จแล้ว ให้ทำการคลิก New file

แล้วก็ตั้งชื่อไฟล์ โดยให้นามสกุลเป็น .ino เพื่อให้ vscode รู้ว่าเรากำลังจะทำ Arduino

ให้เราเสียบสาย usb จากคอมพิวเตอร์ของเรา กับบอร์ด Arduino

จากนั้นก็เลือก Board type


เลือก Serial port

เริ่มเขียน code ได้

เมื่อเขียน code เสร็จแล้ว ให้กด Verify

แล้ว Verify ผ่าน ก็กด Upload


ถ้าเราต้องการ Debug ผ่าน Serial port ให้กดปุ่มนี้

แล้วก็เลือก Baud rate ให้ถูกต้องตามที่เราเขียนโปรแกรมเอาไว้

จอบอ.


ที่มา

https://www.youtube.com/watch?v=3vV_53Os9FU


วันอาทิตย์ที่ 22 พฤศจิกายน พ.ศ. 2563

ESP32 get public ip

พอดีว่า มีงานที่ต้องหา public ip เพื่อให้เครื่องข้างนอก สามารถ remote เข้ามาได้

มี code ดังนี้

https://github.com/kongimi/getPublicIP.git


ที่มา

https://www.esp8266.com/viewtopic.php?f=6&t=12782

วันศุกร์ที่ 16 ตุลาคม พ.ศ. 2563

Arduino Unique ID, Serial number

วันนี้ได้มีโอกาสทำ arduino และ ต้องการจะอ่าน serial number จาก arduino

เริ่มต้นจาก google ค้นหาคำว่า arduino serial number และได้พบว่า arduino มันไม่มี serial number แต่มันจะมีอะไรบางอย่างที่ใช้แทนได้ เขาเรียกว่า "UniqueID" และเขาก็ได้ทำ library มาให้เรา download เรียบร้อย

code ตัวอย่างการใช้งานครับ

#include <ArduinoUniqueID.h>

void setup() {
  // put your setup code here, to run once:
  Serial.begin(19200,SERIAL_8N1);
  UniqueIDdump(Serial);
}

void loop() {
  // put your main code here, to run repeatedly:

}


download library


ที่มา

https://www.thethingsnetwork.org/forum/t/arduino-has-a-unique-id/21415

https://github.com/ricaun/ArduinoUniqueID

http://ww1.microchip.com/downloads/en/DeviceDoc/40001906A.pdf

วันจันทร์ที่ 28 กันยายน พ.ศ. 2563

rpi4b rotate 270 degree

สวัสดีครับ

วันนี้ได้ทำ LCD 7" touch screen ตัวนี้


และต้องทำให้หมุน 270 องศา มีวิธีการดังนี้

1.sudo nano /boot/config.txt

2.เพิ่ม display_rotate=3 บนบรรทัดแรกสุด

3.แก้ไขจาก dtoverlay=vc4-fkms-v3d ให้เป็น #dtoverlay=vc4-fkms-v3d

4.control+o, control+x


ยังไม่จบ เราต้องปรับ touch screen ให้หมุนตามหน้าจอ ดังนี้

1.sudo apt-get install xserver-xorg-input-libinput

2.sudo mkdir /etc/X11/xorg.conf.d

3.sudo cp /usr/share/X11/xorg.conf.d/40-libinput.conf /etc/X11/xorg.conf.d/

4. sudo nano /etc/X11/xorg.conf.d/40-libinput.conf

5.ให้มองหาคำว่า "touchscreen" แล้วเพิ่มบรรทัดนี้เข้าไป

Option "CalibrationMatrix" "0 -1 1 1 0 0 0 0 1" 

6.control+o, control+x

7.sudo reboot

เท่านี้เราก็สามารถหมุนหน้าจอให้เป็น 270 องศา และ touch screen ได้อย่างถูกต้องแล้ว 


ถ้าต้องการปรับหมุนหน้าจอเป็นแบบอื่น

https://www.waveshare.com/w/index.php?search=calibrationmatrix&title=Special%3ASearch&fulltext=Search

สำหรับ 90 องศา ให้ดูตามด้านล่าง

display_rotate=1 #1:90;2: 180; 3: 270
Option "CalibrationMatrix" "0 1 0 -1 0 1 0 0 1"


ที่มา

https://www.waveshare.com/wiki/7inch_HDMI_LCD_(B)


วันศุกร์ที่ 22 พฤษภาคม พ.ศ. 2563

USB QR Code Reader RaspberryPi4

เนื่องจากได้รับงานด่วนๆ ให้ทดลอง usb qr-code reader กับ raspberry pi4
จึงได้ซื้อของยี่ห้อ waveshare มา
สามารถซื้อได้จากที่นี่
https://www.waveshare.com/barcode-scanner-module.htm

คู่มือ ตามนี้
https://www.waveshare.com/w/upload/archive/3/3c/20180623102926%21Barcode_Scanner_Module_User_Manual_EN.pdf

qr-code reader รุ่นนี้ สามารถอ่าน bar-code ได้ด้วย

สามารถใช้งานได้ 2 แบบ คือ แบบ usb และแบบ uart

ในที่นี้ผมเลือกใช้แบบ usb เพราะว่าหน้างาน อาจจะได้ใช้ qr-code reader 2 ตัวพร้อมกัน
และคนที่ติดตั้งก็ไม่ใช่เรา ดังนั้นต้องยืดหยุ่นให้มากที่สุดเท่าที่จะทำได้

เมื่อได้ของมาแล้ว ก็ไม่รอช้า เสียบเข้าช่อง usb ของ raspberrypi4 เลย
ตัว raspberrypi จะเห็น qr-code reader อยู่ที่ /dev/hidraw0
เราสามารถตรวจสอบว่า raspberrypi มองเห็นอุปกรณ์ตัวนี้ไหม โดยพิมพ์ ls /dev/hi* แล้วกด enter
เราสามารถเขียนโปรแกรมให้อ่านข้อมูลที่ได้จากการสแกนจากที่นี่


ซึ่งผมและทีมงานก็ได้พยายามหาข้อมูลจากอาจารย์ goo เหมือนเดิม จนไปเจอที่นี่
https://www.raspberrypi.org/forums/viewtopic.php?f=45&t=55100

ซึ่งมี code ให้อยู่ จึงได้ copy มา แล้วก็ทดสอบเลย
ก็ติดปัญหาบ้าง เช่น
1. code ที่เขาแปะไว้ คือใช้กับ python2 เราก็ต้องเรียกใช้ให้ถูกวิธี
2. code ที่ได้มา มีการ map ค่าที่ได้ ต่างกับ Hardware ที่เรามี ก็ต้องมา map ใหม่ ยุ่งยากเล็กน้อย

สุดท้ายแล้ว ก็ต้องปรับ code จนออกมาเป็นเวอร์ชั่นที่ใช้ได้ ดังนี้

import sys

hid = { 4: 'a', 5: 'b', 6: 'c', 7: 'd', 8: 'e', 9: 'f', 10: 'g', 11: 'h', 12: 'i', 13: 'j', 14: 'k', 15: 'l', 16: 'm', 17: 'n', 18: 'o', 19: 'p', 20: 'q', 21: 'r', 22: 's', 23: 't', 24: 'u', 25: 'v', 26: 'w', 27: 'x', 28: 'y', 29: 'z', 30: '!', 31: '@', 32: '#', 33: '$', 34: '%', 35: '^', 36: '&', 37: '*', 38: '(', 39: ')', 44: ' ', 45: '_', 46: '+', 47: '{', 48: '}', 49: '|', 51: ':' , 52: '"', 53: '~', 54: '<', 55: '>', 56: '?'  }
hid2 = { 4: 'A', 5: 'B', 6: 'C', 7: 'D', 8: 'E', 9: 'F', 10: 'G', 11: 'H', 12: 'I', 13: 'J', 14: 'K', 15: 'L', 16: 'M', 17: 'N', 18: 'O', 19: 'P', 20: 'Q', 21: 'R', 22: 'S', 23: 'T', 24: 'U', 25: 'V', 26: 'W', 27: 'X', 28: 'Y', 29: 'Z', 30: '1', 31: '2', 32: '3', 33: '4', 34: '5', 35: '6', 36: '7', 37: '8', 38: '9', 39: '0', 44: ' ', 45: '-', 46: '=', 47: '[', 48: ']', 49: '\\', 51: ';' , 52: '\'', 53: '~', 54: ',', 55: '.', 56: '/'  }


fp = open('/dev/hidraw0', 'rb')
ss = ""
shift = False
done = False
d = 0
first_char = 0
while not done:
    ## Get the character from the HID
    buffer = fp.read(8)
    for c in buffer:
        d = d+1
        if c > 0:
            if int((c)) == 57:
                print ("Start/Stop Package")
            else:
                ##  40 is carriage return which signifies
                ##  we are done looking for characters
                if int((c)) == 40:
                    if shift:
                        ss += '3'
                    done = True
                    break;
                ##  If we are shifted then we have to
                ##  use the hid2 characters.
                if shift:
                    ## If it is a '2' then it is the shift key
                    if int((c)) == 32 :
                        ss += '#'
                        shift = False
                    ## if not a 2 then lookup the mapping
                    else:
                        if d == first_char+16:
                            ss+= '3'
                            shift = False
                            ss += hid2[int(c)]
                        else:
                            ss += hid[ int((c)) ]
                            shift = False
                ##  If we are not shifted then use
                ##  the hid characters
                else:
                    ## If it is a '2' then it is the shift key
                    if int((c)) == 32 :
                        shift = True
                        first_char = d
                    ## if not a 2 then lookup the mapping
                    else:
                        ss += hid2[ int((c)) ]
print (ss)


เมื่อ save โปรแกรมแล้ว ให้เปลี่ยน permission ด้วย
sudo chmod 766 ชื่อโปรแกรม.py

ตอนเรียกใช้ ให้เรียกใช้แบบนี้
sudo python3 ชื่อโปรแกรม.py

ต่อมา
เราต้องการ QR-Code ตัวอย่าง ในการอ่านข้อมูล ก็ให้หาเวปที่สร้าง QR-Code ได้ ซึ่งมีอยู่มากมาย
ยกตัวอย่างเช่น https://www.the-qrcode-generator.com/ หรือ
https://th.qr-code-generator.com/

เมื่อเราสร้าง QR-Code ได้แล้ว ก็ลอง scan ได้เลย
ค่าที่อ่านได้ จะต้องเหมือนกันกับที่เราสร้างในเวป


น่าจะเป็นประโยชน์ต่อผู้สนใจนะครับ


วันพฤหัสบดีที่ 9 เมษายน พ.ศ. 2563

การทำ qt cross compile raspberry pi4

ถ้าต้องการทำ Cross Compile RaspberryPi4 ให้ทำตามนี้https://mechatronicsblog.com/cross-compile-and-deploy-qt-5-12-for-raspberry-pi/
(ที่มา https://forum.qt.io/topic/109885/cross-compile-qt-5-12-5-for-raspberry-pi-4/7)

ที่ raspberry pi

หลังจากทำ raspbian ลง sd-card แล้ว ให้ทำ headless ssh ตาม step 3, ตามเวปนี้ https://hackernoon.com/raspberry-pi-headless-install-462ccabd75d0

1.sudo nano /etc/default/keyboard ให้เปลี่ยนจาก "gb" ไปเป็น "us"  เพื่อทำให้ keyboard เป็น us
2.sudo reboot
3.sudo raspi-conig
3.1 change password
3.2 change Time-Zone ให้เป็น Asia, Bangkok
3.3 Interface option
3.3.1 Enable I2C
3.3.2 Enable SSH
4.sudo nano /boot/config.txt
4.1 uncomment hdmi_force_hotplug=1
4.2 uncomment hdmi_group=1, hdmi_mode=16
5.sudo apt-get update
6.sudo apt-get upgrade
7.sudo apt-get install wiringpi
8.cd /temp
9.wget https://project-downloads.drogon.net/wiringpi-latest.deb
10.sudo dpkg -i wiringpi-latest.deb
11.check ด้วยคำสั่ง gpio -v และ gpio readall

12.sudo nano /etc/apt/sources.list
uncomment the deb-src line in the /etc/apt/sources.list
  • sudo apt-get update
  • sudo apt-get build-dep qt4-x11
  • sudo apt-get build-dep libqt5gui5
  • sudo apt-get install libudev-dev libinput-dev libts-dev libxcb-xinerama0-dev libxcb-xinerama0
  • sudo mkdir /usr/local/qt5pi
  • sudo chown pi:pi /usr/local/qt5pi

ที่ computer linux

sudo apt-get install python
  • mkdir ~/raspi
  • cd ~/raspi
  • git clone https://github.com/raspberrypi/tools
 mkdir sysroot sysroot/usr sysroot/opt
4บรรทัดต่อไปนี้ ให้เปลี่ยน raspberrypi_ip เป็น ip ของ raspberry pi ที่เราใช้อยู่
  • rsync -avz pi@raspberrypi_ip:/lib sysroot
  • rsync -avz pi@raspberrypi_ip:/usr/include sysroot/usr
  • rsync -avz pi@raspberrypi_ip:/usr/lib sysroot/usr
  • rsync -avz pi@raspberrypi_ip:/opt/vc sysroot/opt
  • wget https://raw.githubusercontent.com/riscv/riscv-poky/master/scripts/sysroot-relativelinks.py
  • chmod +x sysroot-relativelinks.py
  • ./sysroot-relativelinks.py sysroot

wget http://download.qt.io/official_releases/qt/5.12/5.12.7/single/qt-everywhere-src-5.12.7.tar.xz
ที่มา https://www.tal.org/tutorials/building-qt-512-raspberry-pi

เพื่อเป็นการเช็คว่าไฟล์ที่ download มา สมบูรณ์หรือไม่ ให้ทำนี้
md5sum qt-everywhere-src-5.12.7.tar.xz
ควรจะมีผลลลัพธ์ตามนี้ 
ce2c5661c028b9de6183245982d7c120  qt-everywhere-src-5.12.7.tar.xz 
  • tar xvf qt-everywhere-src-5.12.7.tar.xz
  • cd qt-everywhere-src-5.12.7
sudo apt-get install build-essential

=========== ตรงนี้ไม่แน่ใจว่าต้องทำหรือไม่ ====================== 
git clone https://github.com/oniongarlic/qt-raspberrypi-configuration.git

cd qt-raspberrypi-configuration && make install DESTDIR=../qt-everywhere-src-5.12.7
ตรงนี้ให้แก้เป็น
cd qt-raspberrypi-configuration && make install DESTDIR=~/raspi/qt-everywhere-src-5.12.7
================================================

./configure -release -opengl es2 -device linux-rasp-pi-g++ -device-option CROSS_COMPILE=~/raspi/tools/arm-bcm2708/gcc-linaro-arm-linux-gnueabihf-raspbian-x64/bin/arm-linux-gnueabihf- -sysroot ~/raspi/sysroot -opensource -confirm-license -skip qtwayland -skip qtlocation -skip qtscript -make libs -prefix /usr/local/qt5pi -extprefix ~/raspi/qt5pi -hostprefix ~/raspi/qt5 -no-use-gold-linker -v -no-gbm
 จริงๆแล้วควรจะต้องแก้ไขเป็น  -device linux-rasp-pi-vc4-g++ เนื่องจากบอร์ดของเราเป็น rpi4 แต่ทำแล้วใช้ไม่ได้ จึงต้องเป็น -device linux-rasp-pi-g++ ตามเดิม

ตัวอย่างที่แก้ไขแล้ว ที่ใช้ไม่ได้
 ./configure -release -opengl es2 -device linux-rasp-pi-vc4-g++ -device-option CROSS_COMPILE=~/raspi/tools/arm-bcm2708/gcc-linaro-arm-linux-gnueabihf-raspbian-x64/bin/arm-linux-gnueabihf- -sysroot ~/raspi/sysroot -opensource -confirm-license -skip qtwayland -skip qtlocation -skip qtscript -make libs -prefix /usr/local/qt5pi -extprefix ~/raspi/qt5pi -hostprefix ~/raspi/qt5 -no-use-gold-linker -v -no-gbm

หลังจาก ./config ...... เสร็จแล้ว ให้เช็คว่า config สมบูรณ์ไหม โดยให้เปิดไฟล์ config.summary 
ต้องเป็นตามนี้
  • Build options:
  • ......
  • QPA backends:
  • ......
  • EGLFS .................................. yes
  • EGLFS details:
  • ......
  • EGLFS Raspberry Pi ................... yes
ต่อไปก็ make ขั้นตอนนี้นานมากเป็นชั่วโมง ขึ้นอยู่กับความเร็วของคอมพิวเตอร์ของเรา
แล้วก็ make install

 rsync -avz qt5pi pi@raspberrypi_ip:/usr/local
ให้เปลี่ยน raspberrypi_ip เป็น ip ของ raspberry pi

แล้วก็ลง qt ที่เครื่อง linux ของเรา ตามนี้ https://www.qt.io/download
ให้เลือก download for open source users โดยคลิกที่ go open source
 
ลงไปด้านล่างของเวป click download the qt online installer แล้วก็คลิก download


จะมี pop-up ให้ download qt-unified-linux-x64-3.2.2-online.run ขึ้นมา ก็ให้กด save file
- chmod +x qt-unified-linux-x64-3.2.2-online.run
- ./qt-unified-linux-x64-3.2.2-online.run

จะมีอยู่ช่วงนึงจะให้เลือกว่าเราจะลงเวอร์ชั่นไหน ในที่นี้เลือก 5.12.7 เหมือนกับกับที่ทำตั้งค่า cross compile
แล้วก็รอ download กันยาวๆไป
เมื่อลงโปรแกรมเสร็จแล้ว ก็ให้เปิดโปรแกรมขึ้นมา
ไปที่ tools, options, device section(มองหาที่ด้านซ้าย), device tab(มองหาที่กลางบน), แล้วกด add ที่ด้านขวามือ

แล้วเลือกเป็น general linux device แล้ว click start wizard

name : Raspberry Pi
ip : 192.168.1.xx (ตาม ip ของ raspberry pi ของเรา)
user name : pi

จะมีให้สร้าง key deployment ให้คลิกที่ create new key pair

ขั้นตอนนี้ต้องเปิด Raspberry Pi ไว้ด้วย เพราะจะมีการทดสอบระหว่าง qt ของเครื่องคอมฯ กับ RPi

คลิก Generate and save key pair

ไปที่ kit section, compiler tab, แล้วกด Add
GCC, C
ในช่อง compiler path ให้ใส่ ~/raspi/tools/arm-bcm2708/gcc-linaro-arm-linux-gnueabihf-raspbian-x64/arm-linux-gnueabihf/bin/gcc
กด Add แล้วเลือก GCC, C++
ในช่อง compiler path ให้ใส่ ~/raspi/tools/arm-bcm2708/gcc-linaro-arm-linux-gnueabihf-raspbian-x64/arm-linux-gnueabihf/bin/c++

ไปที่ Debugger tab แล้วกด Add
ในช่อง path ให้ใส่ ~/raspi/tools/arm-bcm2708/arm-rpi-4.9.3-linux-gnueabihf/bin/arm-linux-gnueabihf-gdb

ไปที่ Qt version tab แล้วกด Add ให้ตั้ง qmake path ไปที่ ~/raspi/qt5/bin/qmake

สุดท้าย ไปที่ Kits tab, กด Add แล้วตั้งชื่อ และเลือก icon ตามใจ แล้ว configure ค่าต่างๆ ตามนี้
  • Device type: Generic Linux Device
  • Device: Raspberry Pi (defaut for Generic Linux)
  • Sysroot: ~/raspi/sysroot
  • Compiler C: GCC (Raspberry Pi)
  • Compiler C++: GCC (Raspberry Pi)
  • Debugger: GDB (Raspberry Pi)
  • Qt version: Qt 5.12.7 (Raspberry Pi)
กด Apply, OK

หลังจากนี้ ให้ลองสร้าง project ใหม่ จะมีตอนที่ให้เลือก Kits ก็เลือก Raspberry Pi ที่เราสร้างไว้

แล้วก็ลองเขียนโปรแกรมได้เลย
Enjoy!


วันพฤหัสบดีที่ 19 มีนาคม พ.ศ. 2563

check program running, crontab shell script

หากเราต้องการตรวจสอบว่า โปรแกรมที่เราเขียนนั้น ยังทำงานอยู่หรือไม่ ให้ทำดังนี้

วิธีที่1 Terminal

เปิด terminal แล้วพิมพ์
pgrep ตามด้วยชื่อโปรแกรม เช่น pgrep TagAgent
ก็จะได้เลข PID ออกมา ซึ่งเป็นเลข process ของโปรแกรม


วิธีที่2 Shell script (ไม่แนะนำ เนื่องจากพลาดได้บางครั้ง)

ในการเขียน shell script การใช้เครื่องหมายต่างๆ, การเว้นวรรค มีผลต่อการเขียนโปรแกรม
จำเป็นต้องศึกษาการใช้งานสักเล็น้อย ก่อนใช้งาน

สร้างไฟล์ขึ้นมาโดยพิมพ์ nano check_process.sh

#!/bin/bash
sudo rm /tmp/TagAgent.pid
pidof TagAgent >> /tmp/TagAgent.pid
while IFS= read -r line; do
    echo "Text read from file: $line"
done < /tmp/TagAgent.pid

Shell script ตรวจสอบโปรแกรม

ถ้าเราต้องการตรวจสอบว่าโปรแกรมรันอยู่หรือไม่ แล้วถ้าไม่รัน ก็สั่งให้เปิดโปรแกรม ให้ทำดังนี้

nano monitor-process.sh

#!/bin/bash
sudo rm /tmp/TagAgent.pid
sudo pidof TagAgent >> /tmp/TagAgent.pid
declare -i x=0
while IFS= read -r line; do
    if [ $line != "" ]
    then
        echo "Text: $line"
        x=$((x+1))
    else
        echo "No text"
    fi
done < /tmp/TagAgent.pid

if [ $x == 0 ]
then
  cd /home/pi/TagAgent
  sudo ./TagAgent &
else
  echo "run"
fi


เมื่อเราสร้างไฟล์ Script แล้ว ต้องทำให้ไฟล์นี้รันได้
sudo chmod +x monitor-process.sh

และก็ต้องตั้งเวลาให้ไฟล์ตัวนี้รันทุกๆ 1 นาที
เราสามารถทำได้โดยใช้ Crontab ดังนี้

พิมพ์ crontab -e
บรรทัดล่างสุด ให้เพิ่ม
* * * * * /home/pi/monitor-process.sh
กด control + o, control+x
sudo /etc/init.d/cron restart


ในรูปนี้พลาดไปอย่างนึง คือมันจะ reboot ทุกๆนาทีตอนตี 2 หมายความว่า 2.00 น., 2.01 น., 2.02 น. ... จะ reboot ตลอดทุกนาที จนกว่าจะถึงเวลาตี 3
ดังนั้นถ้าจะแก้ให้ถูกต้อง คือ reboot แค่ครั้งเดียวตอนตี 2 จะต้องแก้เป็น
0 2 * * * sudo reboot

และจากการทดสอบใช้จริง การใช้ pidof จาก shell script (วิธีที่2) มันจะมีการเช็คพลาดบางครั้ง
ดังนั้น จึงไม่แนะนำให้ใช้ วิธีการนี้ครับ

จบ

ที่มา
https://stackoverflow.com/questions/10929453/read-a-file-line-by-line-assigning-the-value-to-a-variable
https://linuxize.com/post/how-to-remove-files-and-directories-using-linux-command-line/
https://bash.cyberciti.biz/guide/Create_an_integer_variable
https://askubuntu.com/questions/682913/how-to-write-shell-script-to-start-some-programs

วันศุกร์ที่ 7 กุมภาพันธ์ พ.ศ. 2563

RaspberryPi Connect bluetooth printer ทำยังไง ตอนที่2

จะเป็นการลง Driver ที่ตัว CUPS


ถ้าเราเคยลง driver ไว้ก่อนหน้านี้แล้ว ให้เอาออกก่อน 2 ไฟล์ ดังนี้
/usr/share/cups/model/Custom/
MY3 raster file from /usr/lib/cups/filter/.

0) download driver


เมื่อ download มาแล้ว ให้นำไปวางไว้ใน raspberry pi แล้วแตกไฟล์
tar -xvzf /path/to/yourfile.tgz
เมื่อแตกไฟล์เสร็จแล้ว ให้รัน  MY3_CUPSDrv-200.sh.
sudo ./ MY3_CUPSDrv-200.sh.


1) sudo apt-get install bluez-cups
2) when you add printer from Cups WebPage, add the printer as "AppSocket"

3) in connection box write "bluetooth://BTADDRESSwithoutcolumns/spp"
if the BT Address is 00:80:E1:BA:D4:C3, then you have to write
bluetooth://0080E1BAD4C3/spp
แต่เราต้องรู้เลข Bluetooth ก่อน ตามนี้
 
4)ใส่รายละเอียดต่างๆ
5)เลือกยี่ห้อ printer
6)เลือก Model

7)Set Default
8)Print test page

ตัวอย่าง code python ในการสั่ง print รูป

import cups

conn = cups.Connection()
printers = conn.getPrinters()
for printer in printers:
  print printer,printers[printer]["device-uri"]

printer_name = 'MY3'
file = "/home/pi/DriverPrinterCustom/VKP80III_CUPSDrv-202-PKG/scorpion.png"
conn.printFile(printer_name,file,"PDF Print",{})


ที่มา


 https://unix.stackexchange.com/questions/223397/cups-does-not-recognize-bluetooth-receipt-printer
 https://bbs.archlinux.org/viewtopic.php?id=88250

วันอังคารที่ 21 มกราคม พ.ศ. 2563

RaspberryPi connect bluetooth printer ทำยังไง

ในการใช้ Raspberry Pi ติดต่อกับ Bluetooth printer มีสิ่งที่ต้องทำหลักๆ ดังนี้

1.ติดตั้ง bluetooth
2.software python


1.ติดตั้ง Bluetooth

sudo apt-get update
sudo apt-get install pi-bluetooth
sudo apt-get install bluetooth bluez
sudo apt-get install python-bluez
sudo hciconfig hci0 piscan
sudo hciconfig hci0 name 'Device Name' // change Device Name
sudo python /usr/share/doc/python-bluez/examples/simple/inquiry.py
เพื่อดูว่า ตอนนี้ raspberry pi ของเรา มองเห็น Bluetooth Custom printer รุ่น MY3 หรือยัง ถ้าเห็นแล้ว จะขึ้นแบบนี้


ในที่นี้ Address ของ Bluetooth Custom printer รุ่น MY3 คือ 00:80:E1:BA:D4:C3

2.Software python

เราจะลองส่งคำสั่งให้ปรินท์ Logo หมายเลข 0 ที่มีอยู่ในเครื่องอยู่แล้ว ออกมา

sudo nano test_print.py

import bluetooth
bd_addr = "00:80:E1:BA:D4:C3"
port = 1
sock = bluetooth.BluetoothSocket( bluetooth.RFCOMM )
sock.connect((bd_addr, port))
data = [0x1D,0x70,0x00,0x00,0x0A,0x0A]
for i in range(0,6):
  sock.send(chr(data[i]))
sock.close()

กด Control + "o", enter, Contrl + "x"

สั่งรันโปรแกรม
python test_print.py

ซึ่งได้ผลลัพธ์ แบบนี้
ที่ทำมานี้ คือสั่ง print แบบใช้ command ส่งเข้าไปที่เครื่อง จำเป็นที่จะต้องอ่าน manual ของเครื่องว่าต้องส่งอะไรเข้าไปที่เครื่อง

อธิบายเกี่ยวกับคำสั่ง
0x1D,0x70,0x00,0x00

0x1D,0x70 หมายถึง ให้ปรินท์โลโก้
0x00 หมายถึง ภาพที่0
0x00 หมายถึง ขนาดของรูปภาพ โดยถ้าเปลี่ยนเป็นเลขอื่น มีความหมายดังนี้
0 = normal
1 = double width
2 = double height
3 = double width and double height


ที่มา

https://www.cnet.com/how-to/how-to-setup-bluetooth-on-a-raspberry-pi-3/

https://kaebmoo.wordpress.com/2017/06/26/bluetooth-raspberry-pi/
ให้ดูตรงที่ ไม่ต้อง compile เอง

https://www.youtube.com/watch?v=He-3-zLgVMM ประมาณนาทีที่ 7 เป็นต้นไป
https://www.cnet.com/how-to/how-to-setup-bluetooth-on-a-raspberry-pi-3/

https://www.programcreek.com/python/example/19860/bluetooth.RFCOMM // อันนี้ ok

http://pages.iu.edu/~rwisman/c490/html/pythonandbluetooth.htm

https://www.raspberrypi.org/forums/viewtopic.php?t=232626
http://mattrichardson.com/Raspberry-Pi-Wireless-Photo-Printing/